Monday, September 30, 2013

Mini-Wardrobe contest

It's that time of year again... Pattern Review's mini-wardrobe contest!  And even more excitingly, I actually finished!
 
For your edification:
 

For my wardrobe I made a coordinating skirt and blouse in a purple floral rayon with a white silk chiffon yoke, a high-waisted leather pencil skirt, and a long sleeve tee in a cream color jersey.  The purple print skirt was self-drafted, the blouse was loosely based on Simplicity 3688.  I made the skirt from Vogue 1324.  Which I discussed at LENGTH in posts from earlier this month. 


The purple print skirt was a simple self drafted pattern with gentle gathering, pockets in the side seams and an interfaced, slightly shaped 1" waistband that sits at the natural waist.  The skirt has a 9" zipper along the back seam and fastens with a large black button.  Now I am not a genius when it comes to drafting patterns by any stretch of the imagination (I'd love to take a class someday... and if wishes were horses) but this was a breeze and took no more than an hour to draft and construct.
 
For the purple print blouse I cut the bodice front and yoke from 3688; the front from the purple floral and the yoke from a white silk chiffon.  For the back, I frankenpatterned the back of 3688 and the upper back of the blouse from V1324 to create a light, easy feeling.  I then made bias tape from the print material and used that to finish the collar and armholes as well as creating a large buttonhole at the collar where I attached a black button which matched that on the skirt. 
 
The blouse can also pair with the camel-colored leather pencil skirt. 
 
 
The prize detail on this pencil skirt is the seaming at the front sides.  The back of the skirt has a shaped waistband which then ends at the front dart.  This bit was definitely tricky and I made a muslin out of a gray suiting before cutting into my skins.  On the original muslin I followed the directions as written and found it to be tricky to get the seams to line up perfectly.  On the second, leather version I assembled the entire side and sewed the seam last to create a clean line which I think turned out very well.  I am incredibly proud of this skirt which I finished with a zipper I picked up from the handbag department.  
 
 
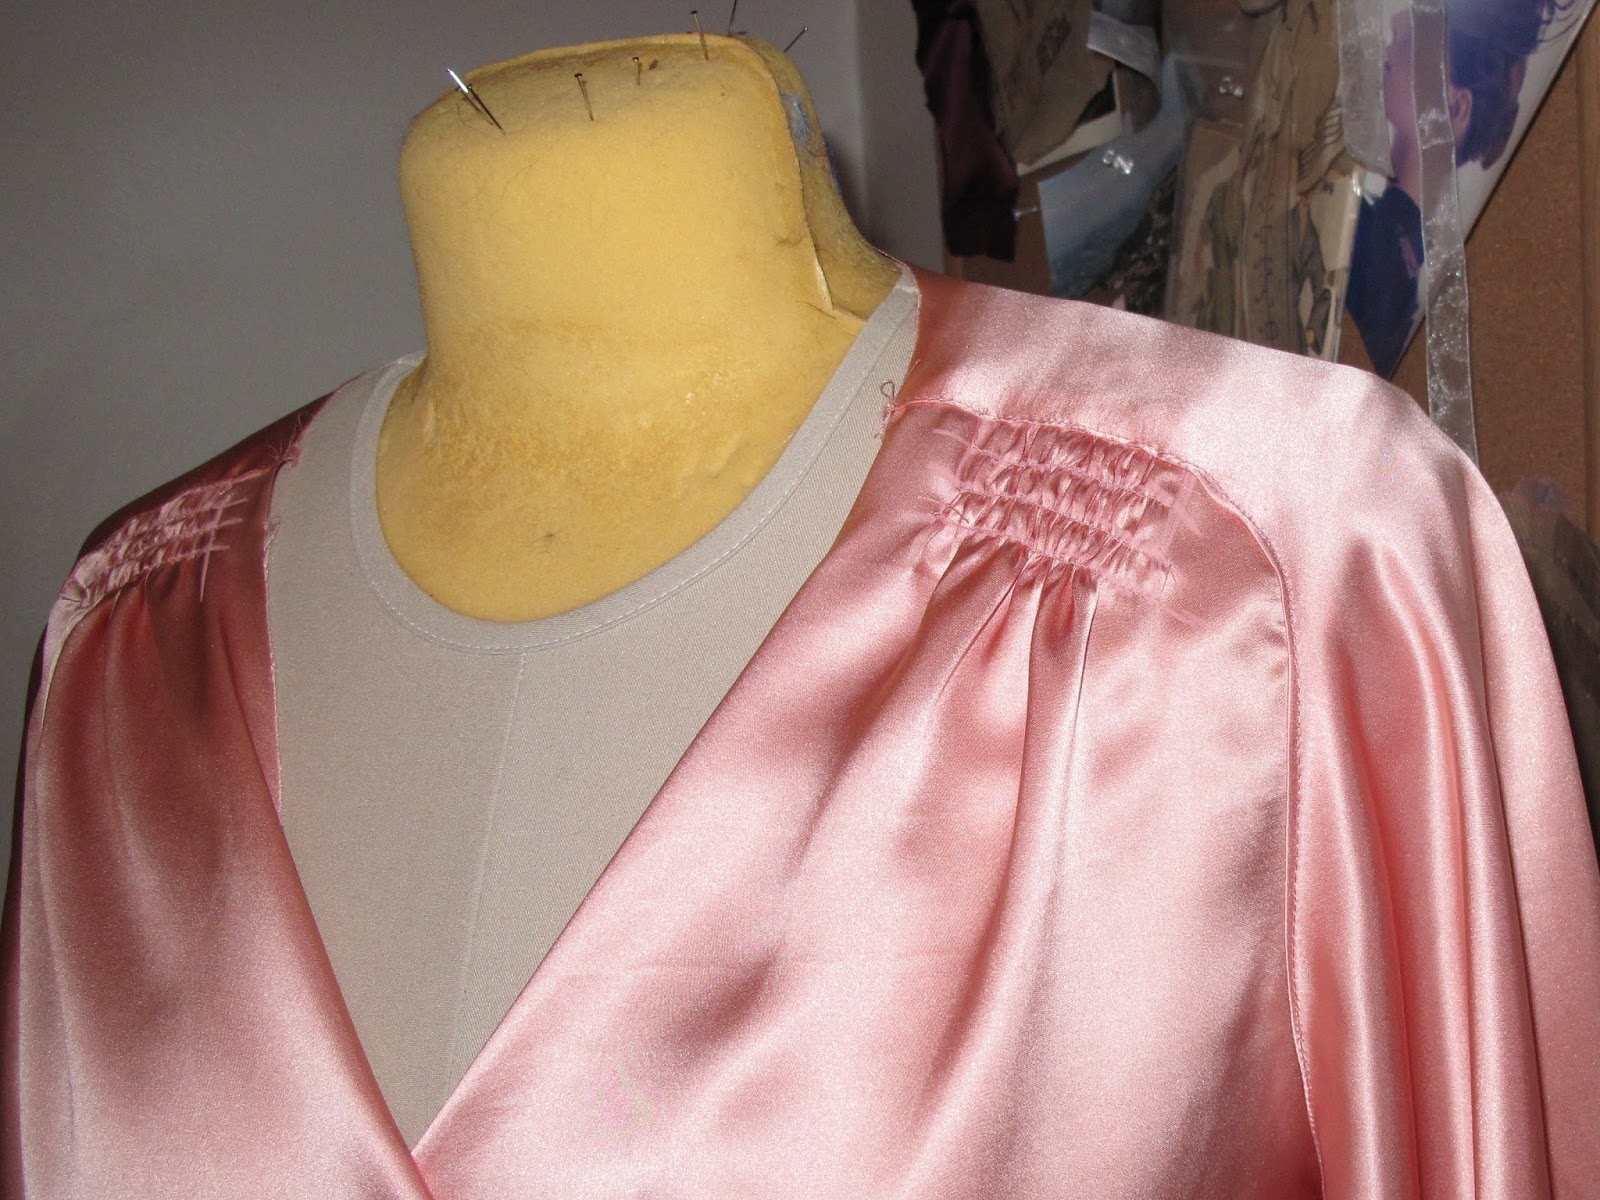
And of course, a lovely basic like a leather pencil skirt will always pair nicely with another basic, the classic white T.  This t-shirt is a Palmer/Pletsch pattern from McCall's, M6399. I made view B.  Now, the beauty of the Palmer/Pletsch patterns is the very explicit fitting directions.  And not to step away from recieved wisdom, but I have to disagree with the pattern's esteemed creators when it comes to fitting this top in a knit.  I used a 4-way stretch jersey and realized that if I cut it in my normal size as the pattern recommends it would be HUGE!  I cut a straight 14 and it was still very roomy despite the pattern's insistence that I would need to make extensive alterations.  I also left out the shoulder pads, because...gross?  Here's the deal with this shirt... The pattern photo is incredibly dated as is the desire to make this in a woven, with a zipper and shoulder pads.  But in a drapy knit?  Those side pleats are gorgeous!  This is one of those cases where the dress form doesn't really do the garment justice.  The wide collar and raglan sleeves are flattering to the shoulders and collar bones and the pleats allow the fabric to ease over the bust without pulling and creates a nice drape over the lower mid-section.  I highly recommend this as a basic (so long as you promise to leave the 80s behind).


And of course, a lovely "not so basic" tee will pair nicely with the gathered print skirt.  I would probably add some additional chic-ness to this outfit with a jacket or cardigan, chunky jewelry and maybe some colorful pumps. 

 
In the end the mini-wardrobe contest gave me the opportunity to put together some easy basics for fall in this new California climate. 
 

Go to Patternreview.com and vote for me!
 

Friday, September 6, 2013

Happy National Sewing Month!


It’s National Sewing Month!  I know we are already a week into September, but I just remembered this most important of unofficial and made up holidays!  Although to be fair, National Sewing Month has not always been unofficial…

On September 24, 1982, President Ronald Reagan signed Proclamation 4976, declaring September of that year as National Sewing Month:

“Tens of millions of Americans sew at home.  Their efforts demonstrate the industry, the skill and the self-reliance which are so characteristic of this Nation.
In recognition of the importance of home sewing to our economy the Congress has, by Senate Joint Resolution 205, designated September, 1982 as National Sewing Month.
Now, Therefore, I Ronald Reagan, President of the United States of America, do hereby proclaim September, 1982, as National Sewing Month.  I call upon the people of United States to observe this month with appropriate ceremonies and activities.
In Witness Whereof I have hereunto set my hand this 24th day of Sept. In the year of our Lord nineteen hundred and eightytwo, and of the Independence of the United States of America the two hundred and seventh. “
September was again declared National Sewing Month in 1983, 1984, 1985, and 1988. 
In 2004 the Home Sewing Association (HSA) requested a revival of National Sewing Month which was sadly denied.  (I don’t know why it was denied as September is also officially National Preparedness Month, National Honey Month, National Guide Dog Month, National Childhood Cancer Month, and National Yoga Month… I mean, who decided sick kids and bees are so important?  Can they not share? Whatever yogis!) Not to be deterred, our intrepid stitchers determined that they didn’t need an official government declaration to proceed with their holiday and instead launched a themed advertising campaign in 2005.  After the HSA was shuttered in 2007, the American Sewing Guild and the Sewing & Craft Alliance took up the Sewing Month mantle and we are now celebrating our ninth consecutive National Sewing Month:

2005: Sewing…the alternative yoga
2006: Sewing… Express your Creative Spirit
2007: Sewing… It’s what you make of it
2008: Go Green! Sew Green!
2009: Reuse, Remake, Restyle
2010: Sewanew
2011: Sew for the LOVE of it
2012: Sew for the FUN of it
2013: Sew for the SKILL of it

And in the spirit of this year’s theme (albeit unintentionally) I have already started discovered a new-found skill:  working with leather!  To continue on this celebratory path, I may just have to bust out some of my couture books and work on developing some additional skills as I continue to build my mini-wardrobe this month.


Now before I sign off, I did want to draw attention to a mild quirk in the Reagan proclamation.  You see that second to last paragraph?  Where he calls on Americans to partake in appropriate ceremonies and activities?  What exactly is a home sewing ceremony?  If you complete a perfect welt pocket do hooded figures raid your stash and force you to take an oath by the light of a thousand Berninas?  Do you swear on a copy of Burda?  Is Claire Shaeffer a high priestess?  Is the Church of Craft involved?  Because dude, I totally want in!


Mini-Wardrobe progress... V1324, in Leather!

After completing a version of V1324 in gray to test the fit, I decided to cut into my leather.  Now the four skins I purchased provided plenty of actual material but sadly, none of the skins were large enough to cut the entire back piece due to the odd shape. 
 
The back of this skirt has a large pointed section which wraps over the hip to join near the front darts.  So I decided to piece these back sections by dividing the pattern into four smaller segments and adding seam allowances as follows.
 
 
And then I did something truly idiotic.  The large middle section?  The big section in the middle that will go directly over my backside?  I accidentally cut two of the left side.  In a moment of panic, I then decided to cut some of the smaller upper sections from that mis-cut left and wound up dramatically short.  So I decided to make this a design element and pieced scraps together in a sort of odd quilted design.  And strangely, I like it!  Necessity, in this case was truly the mother of invention.

 
For the zipper I dug out a handbag zipper from the stash that was a shockingly good match to the color and used the same lining material as my muslin version.  

 
On this version, I also attached the waistband and stitched the dart in one continuous go, which I think created a much smoother, neater, and more professional line.  


So all I have left to do is finish the back seam (secure the bottom of the zipper and complete the vent) and hem both the lining and decide how I want to finish the hem on the leather. 

Altogether, my first experience sewing with leather went very well!  I used some leftover Amazon gift cards from my birthday to purchase a Teflon foot and leather needles for my sewing machine.  This leather was thin enough that I was otherwise able to treat it like normal fabric.  Rather than using leather glue and a mallet to secure the seams I just pressed gently with a press cloth on low with no steam and that seemed to do the trick.

So soon I will be on to my next mini-wardrobe project, the floral blouse with a silk chiffon yoke.  I am planning on using the same pattern I used to create the following unfinished object (just waiting for a day I feel like doing a lot of hand applique.)


This is generally the shape I want although I'm hoping to add a little more floaty fullness around the bust and reshape the armholes.  Also the back of this blouse will not be sheer.  This design was inspired in part by this 40's retro pattern.  I may again borrow some pattern pieces to use as a jumping off point... This blouse is my goal for this weekend (and the skirt if I'm very ambitious!) so I should have more news on this matter very soon!


Thursday, September 5, 2013

The skirt from V1324 - a wearable, if imperfect, muslin

 
As I've mentioned, I'm intending on entering the Mini-wardrobe contest on patternreview.com.  As part of this plan I am making a pencil skirt out of a pearl finished lamb-skin leather.  Now I don't have a great deal of experience working with leather, but I do know that you can't judicially utilize a seam ripper... any needle holes will be visible forever.  So instead it is crucial to get things right the first time, therefore I decided to test/muslin my pattern before trying my hand at the skins.

Now I wanted a high waisted classic pencil skirt with some interesting seaming.  After looking through my stash (which has been significantly pared but is still waaaaay too large) I settled on a Donna Karan for Vogue pattern, V1324


As much as I love aforementioned interesting seaming, it definitely creates some challenges insofar as standard alterations.  This pattern has no sideseams to take out or in and the waistband across the back does not continue across the front, instead stopping at the angled front darts.  Now before tackling this pattern, I looked at a few reviews from other seamsters who had completed this pattern.  However, nobody seemed to have any suggestions as to my particular fitting issues.  Generally speaking, I need a waist measurement at least a size smaller than my hip measurement.  However, the front of the skirt typically fits and I need to add volume and deepen the darts in the back.  Here, with front, side, and back panels, I was at a loss.  So I just cut everything in an 18 from some gray suiting in the stash and called it a day.  I figured this would give me the opportunity to adjust if needed and hopefully end up with a wearable, if imperfect, skirt.


Shockingly, this skirt fits surprisingly well!  While it's a little tight across the widest point of the hip/thigh which leads to some smile lines unfortunately highlighting the lower belly, it otherwise fits and is comfortable.  I actually wore it today at work with a longer sweater  And the fit on my dress form (customized to me a few dozen pounds ago) suggests that the fit will only  improve as I lose a few inches.

Other than the fitting issues (which I think I can manage but just adding some additional width to the center back pieces and shifting the darts) the hardest part of this pattern is the waistband.  The horizontal waistband fits at an angle into the front center piece which is solid all the way up.  I interfaced the waist with organza  to add some extra structure. 


Now on the next version, I plan to adjust the order of the steps to create smoother waistband. I think that the waistband into the darts will sit smoother and be easier fit the seam and dart are sewn as one solid entity rather than trying to match the previously sewn dart to the seam.  Likewise, I plan to assemble the entire outer shell and the the entire lining and then attach along the waist in one go which I think will eliminate the slight scalloping that this version suffered from.


For the lining, I used a silky polyester in a peacock print that I had in my stash from a now long-forgotten project.  I have enough to cut a lining for another skirt as well so both the gray and leather versions will be lined in this lovely print from JoAnns. 

 
Like I mentioned above, I wore this skirt today and only have a few limited complaints.  Despite my interfacing, the high-waist still wrinkled and sagged after a day of sitting in a cubicle.  On the bright side, after a few hours of wear, the tightness in the hip stretched and relaxed to a better fit.
 
Depending on how the leather version turns out, I may also try this skirt in a heavy double knit.  Overall, if you like a pencil skirt this fits well and comes together easily while still providing a constructural challenge this is a good bet.  Additionally, the angled seams and tapered seam emphasizes the hip in a good way.  I think the seams visually widen the hip but in a sexy, curvy way.  Who doesn't like that?


Wednesday, September 4, 2013

Decades of Style - 1930s Butterfly Blouse

Originally, I was going to put up a post about the wearable muslin I made of V1324, which I plan to use on a camel colored leather skirt for my mini-wardrobe.  Sadly, when I take pictures on my phone and email them to myself they often take several hours to reach the computer.  Now I could get out a cord and move the photos manually... but I'm lazy. 

So instead you will be treated to a review of a beautiful pattern by Decades of Style, #3005 the 1930s Butterfly Blouse!  This is the first pattern I've ever purchased from Decades of Style largely because they don't go on sale for $0.99 at JoAnns.  This is one of only a handful of patterns that I've paid full price for, but given that I've admired it from afar for years, I finally capitulated and bought this pattern.  In March.  I made this blouse in March.  And never blogged it.  There are many such garments, so if I all of a sudden seem oddly prolific, you may just be enjoying the fruits of my distantly past labour.

Anyway, I bought this pattern for full price and bought the requisite yards and yards of silk charmeuse in a beautiful ballet shoe pink.  When my shipment of fabric arrived from Fabric Mart it looked suspiciously familiar...


Do you recognize it?  How about now?

 
That's right... this was the fabric so nice, I bought it twice.  I had purchased the fabric for the dress I wore to the fanciest wedding in the world at the Virginia Marti fabric store which has since closed.  While I had received an email notification that their stock was transferred to Fabric Mart, it never dawned on me that I may accidentally purchase the exact same fabric from two different vendors!  Good thing I look good in this color!
 
While this pattern itself comes together well and is not particularly challenging, the fabric I chose?  Is.  Oh silk charmeuse... I love your fluidity and drape, I love your sheen and the feeling of you on my skin.  But my goodness you are persnickity!  You shift and move and make it impossible to cut as precisely as I'd like.  And neat and tidy topstitching?  Forget about it.  But more on that in a moment...
 
The showstopping element in this garment is the incredibly full sleeves which flutter gracefully from a shirred shoulder and the saddle yoke.  All the pieces are curved and rather than standard seaming the edges are lapped and edgestitched. 


As mentioned a moment ago, I am not completely pleased with the edgestitching.  I've never been one to have the patience for edgestitching or topstitching or any other form of stitching that is visible from the right side.  The insides of my garments are attractive on the insides due more to my consistent use of linings rather than my neat and clever machine work.  And I know the problem.  To do this sort of thing neatly you need to engage all sorts of best practices.  You need to pin.  And take your time.  And generally not shove your material through your machine pedal to the metal on the fastest possible speed.  And all of this goes double for a challenging, slippery fabric.  But did I do these things?  Of course not!  I just continued along my merry way with my usual terrible technique and I wound up with a wearable, if flawed product.  C'est la vie.
 
 
To finish the edge of the neckline and hem I made bias tape out of my leftover scrap fabric.  Given the edgestitched details of the yoke and sleeve, this finish felt appropriate to the garment, although it adds a bit of a dressing gown/lingerie feeling that I would have perhaps been well to avoid.  
 
This blouse also features a wrap front. (So flattering!) And a nice wide sash tie.  (Ditto!)


Overall, it turned out quite well (if difficult to photograph) and I think will look beautiful with the charcoal gray suiting I used to create the high waisted skirt I muslined for V1324.  I may have to awkwardly pose in a window frame to show it off!