So the avocado dress is unfortunately on hold until I can make a Jo-Ann run and procure additional thread. While one spool is generally more than enough for a single dress, that does not hold true when my sewing machine is possessed by anti-bobbin-winding demons.
Happily, I did make some progress... I finished assembling and pressing the front drape pieces and attached the midriff to the bodice. Not so happily, this needs tobe redone. Somehow even though the side seams and all the pattern markings match up perfectly, once turned to the right side, the midriff is not centered. It's technically centered, it just looks horribly askew. So I am now going to need to pick out my stitches and see whether I can make it work.
I'm pretty sure this dress is cursed. It's the only explanation for how unreasonably challenging this is proving to be...
So instead I got started on my Jalie 2908 Jeans.
This has been a planned project for quite some time. This pattern got such glowing reviews that I simply had to try it! I picked up a dark wash stretch denim from Jo-Ann Fabrics some time ago along with thread for topstitching and Dritz Jeans buttons in antique brass. Now for some unholy reason, it seems that Dritz produces Jean buttons and Jean rivet tools, but not the appropriate rivets? I found some plain nickel rivets but not the nipple or ring rivets that are commonly seen on RTW denim and not in the antique brass to match the button. (Yes, it IS that important... mixed metals drive me nuts.) I ultimately plan on placing an order with grommetmart.com, but not until my next paycheck...
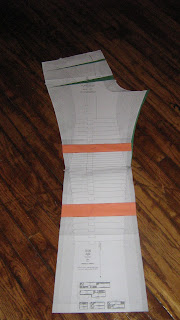
Last night I altered my pattern. After measuring both myself and the paper pieces, I realized that I would need to lengthen the leg by 3 1/2 inches (1 1/2 inch above the knee and 2 inches below) as well as adjusting for my "protruding derriere" as one of my fitting books so charmingly puts it. I started by adjusting the length. I cut the pattern a few inches both above and below the knee and added the extra length. Here is a photo of the lengthened back compared to the unaltered front.
Then I needed to add 2 inches to the crotch seam on the back piece to properly accommodate my "assets" if you will... I began by adding 1/2 inch where the crotch and inseam meet and then tapering the added fabric toward the knee. This has the added advantage of a little more ease in the upper thigh area. However, when making this alteration you don't want to add more than 1/2 inch to 3/4 inch at that point or you risk bagginess under the seat. This is not an attractive look for anyone! So I added the additional 1 1/2 inches by slicing the pattern horizontally until I created a hinge at the outer hip and adding two wedge shaped segments to assure that I will have the necessary fullness in the seat. Below is a closeup of the altered crotch seam.
And here is the fully altered back.
Since this is the first time I'm attempting this pattern I used one size larger than the pattern suggest for my measurements. I think this will give me the wiggle room to make any further alteration and fit as I go. Based off my measurements I'm pretty sure I'm going to have to take in the waistband and make some alterations to the yoke to cure my gaposis but I am more comfortable tacking that when I am working with the actual fabric than trying to alter the project on paper using only my tenuous math ability.
My fabric has been pre-washed so tonight I cut! Wish me luck :)


No comments:
Post a Comment